New Concept of Maxillary Sinus Lift through a New Implant Dedicated: “2s Implant”
*Corresponding Author(s):
Maurizio SerafiniPrivate Practitioner, Via Caduti Sul Lavoro, 37 - 66100 Chieti, Italy
Email:serafinidrmaurizio@gmail.com
Abstract
The method which I created and use in my daily routine, it’s a Soft-Surgery approach. The access can be made through an operculum or a mucoperiosteal flap, followed by an invitation to the alveolar crestal bone with a drill using different size burs and to avoid the breaking of the floor of the sinus and tearing of the schneiderian membrane, is important to stop a few millimeters from it. Follows the placement of the implant, 2s implant. The insertion of the implant will produce a progressive fracture of the sinus floor by lifting it together with the membrane, preventing the breakage of the membrane, with a noninvasive procedure.
INTRODUCTION
The loss of the posteriors teeth in the upper arch, especially if not replaced by dental implants for a long time, results in a time-dependent reduction in the height and density of the bone by several millimeters and in a large pneumatization of the maxillary sinus, thus consequently requiring additional surgery to implement the bone height and density before rehabilitation with osseointegrated implants [1].
In these cases, a maxillary sinus floor elevation is prior needed, in order to reestablish adequate quantity and quality of alveolar bone for implant placement in the posterior maxilla [2].
For over forty years, various techniques have been proposed to the literature for both vertical and horizontal augmentation in order to restore adequate bone thickness and height.
Historically, in 1977 Tatum began to perform the sinus lift through the crestal access: the bone was removed until the exposure of the Schneiderian membrane which was then raised; using tools he studied and produced, to allow a bone graft [3]. The technique was then modified and published by Boyne and James in 1980 [4] and later this method was refined by Summers under the name: Bone Added Osteotome Sinus Floor Elevation (BAOSFE), by the use of specifically designed osteotomes [5]. After penetration into the maxillary sinus, bone grafting is performed along with the autologous bone fragments pushed inside with the osteotomes.
Today, in order to perform a maxillary sinus lift, two techniques are basically used: great sinus lift and sinus lift by the crestal route.
Great sinus lift
Great Sinus Lift provides for the lateral opening on the maxillary bone (vestibularly or palatally) of a bone window to access the sinus cavity, through a large detachment of the gingival mucosa and allow to produce a window practiced with rotating burs o with piezosurgery; then, with specifically designed instruments the sinus membrane is safely detached from the floor of the sinus cavity, and it is followed by a bone graft, which can be heterologous -of animal derivation or synthetic material (Bioglasses)- or autologous bone, taken from the same patient from another site (mandible, cranial theca or iliac crest); for the latter two, the patient must be hospitalized.
The bone graft will induce osteogenesis (regeneration) and this will lead to an increase in the volume and height of the bone.
Despite the promising results, the great sinus lift surgery is strongly invasive and associated with unpredictable bleeding complications, related with the extreme anatomical variability of the vascularization of the lateral wall of the maxillary sinus.
Massive bleeding would affect the result by decreasing the visibility of the operating field, with a consequent increase in the risk of damaging the membrane and thus lengthening the operating times. Furthermore, the reduced blood flow in the grafted area, caused by the rupture of the anastomoses, is also responsible for the failure of the neo-angiogenesis process that should vascularize the graft, while the rupture of the membrane which statistically equals 35% would decree a sure failure of the graft intervention.
Sinus lift by the crestal view
The second approach usually adopted to sinus lift, is by the crestal view: it requires to access the sinus with cylindrical-conical surgical instruments with different diameters and variable lengths, called “Summers” osteotomes, which are made to penetrate the bone with a surgical hammer, from the cortical bone crest upon invitation with bone burs.
Also this technique offers some limitations: in order to perform the maxillary crestal sinus lift, considerable surgical skill is required because progressive hammering, if not performed with meticulous dexterity, can cause rupture of the membrane covering the sinus walls and failure of the surgery itself, with loss of bone and time, relative to membrane healing, which takes 3 to 6 months. In addition, the hammering action produces widespread rumblings throughout the skull with a sense of clouding and frustration that persist for several days in the patient and there may be excessive traumatism related to the compression of the crestal bone, if stopped drills are not used to make an invitation to the osteotomes.
In addition, the rupture of the sinus membrane would cause oro-antral communications and the possibility of acute and chronic infections such as sinusitis, abscesses, empyema and osteomyelitis.
Other membrane lifting techniques
Another type of maxillary sinus lift via the crest consist in the use of balloons [6] to be inserted inside the sinus itself and through a syringe to inject sterile physiological solution to expand the balloon: once the sinus membrane is lifted, the bone graft, autologous – heterologous is added. However, this type of membrane lifting still requires the use of osteotomes and hammering blows to fracture the anatomical base (floor) of the maxillary sinus, with possible simile complications as listed above.
Today there are also burs that perforate the sinus floor avoiding to damage the Snaiderian membrane.
Alternatives to sinus lift
In order to avoid these complications thus allowing the patients implant rehabilitations, literature and evidence based dentistry have proposed alternative methods, such as:
- • Zygomatic implants,
- • Short implants,
- • All-on-four
- • Full-arch systematic implants.
Zygomatic implants involves the use of long implants that start from the basal bone crest to reach the cheekbone, near the patient's eye socket, a very invasive and technically difficult operation, which need to be performed by expert maxilla-facial sugeons, while mini implants or “shorts” have a root (implant)/dental crown ratio clearly unfavorable for the former and, hence, are unreliable.
NEW CONCEPT OF MAXILLARY SINUS LIFT, DESIGNED AND BUILT BY ME, THROUGH A NEW IMPLANT DEDICATED TO IT “2S IMPLANT”
It is an implant made with grade 5 titanium (90% Ti - 6% Al - 4% Va)
Aluminum reduces the specific weight, improves the hardness and the modulus of elasticity making it similar to that of bone, thus allowing a more equitable redistribution of the load of forces in the bone-implant structure, while Vanadium increases its resistance by about half to fatigue wear.
The surface technology, an essential cornerstone in the biological bone-implant response and created by Nobel Bio Reaserch, a leader company in the research and production of implant surfaces, is treated with a double acidification giving an average roughness of 0.5 - 20 - 40 microns, resulting in a high BIC (Bone Implant Contact), so after these procedures, the wettability of the implant is high, thus giving the possibility to the clot that forms on its surface to create the optimal conditions so that the fibrin matrix can adhere and induce osteogenesis from contact (Figure 1).
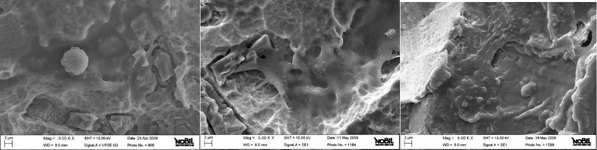 Figure 1: Microscopic implant surface with a double acification, numerous cells and collagen bridge can be seen on the implant surface
The implant
The study of these implants focuses on the micro/macro geometric morphology that guarantees optimal bone-implant contact and excellent primary stability.
The structure of the “Reverse Conical Neck” reduces stresses in the cortical region.
The double conicity of the implant and the progressive variability of the coils with an innovative design, allow easy and rapid insertion and a more uniform bone-implant contact.
It also minimizes Bone Crestal Remodeling and guarantees long-term maintenance of the crestal bone. It has a sharp apical thread and the subsequent increase in thickness, with a concave profile; gives a 2s implant a remarkable self-tapping capacity, self-bradding and atraumatic bone compaction, both vertical and horizontal (Figures 2-4).
 Figure 2: Vision of the implant under an optical microscope at 16 magnification.
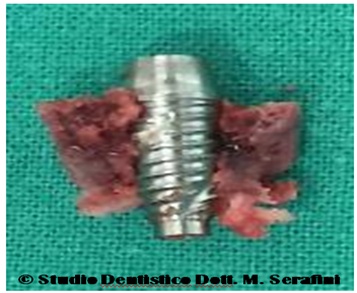 Figure 3: The prototype was inserted and the bone was been fractured in half.
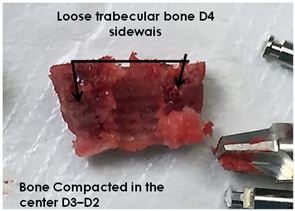 Figure 4: The prototype was been removed and we note: laterally loose bone and compacted bone in the middle.
The first important feature of this implant is the apical portion, which has a cylindrical shape without coils with a sharp profile and a concave base, like a round hemisphere, in order to perform a sinus lift crest, without the use of osteotomes and surgical hammer, as is the case now (Figures 5,6)..
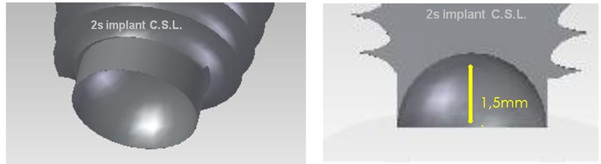 Figure 5: Images of apical implant 3D view.
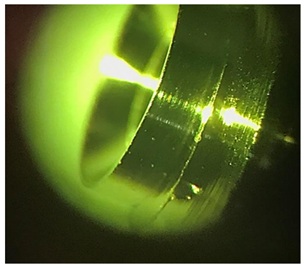 Figure 6: Microscope view.
The second feature is the connection with the prosthetic abutment, which is initially conical in shape and has a 12-pointed star-shaped knurling (godronatura) in depth (Figure 7).
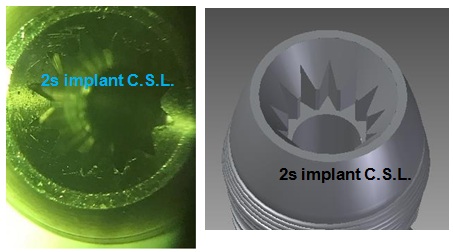 Figure 7: Microsope and 3D view.
The tapered collar is mirror polished and the micro-thread on the collar helps to increase the contact area, also preserving a larger portion of the periosteum with trophic activity of the peri-implant cortex (Figures 8,9).
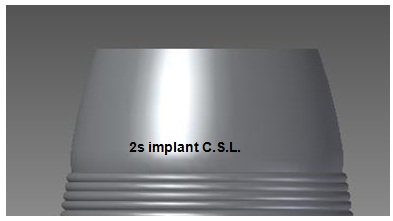 Figure 8: 3D view: tapered collar with micro-thread.
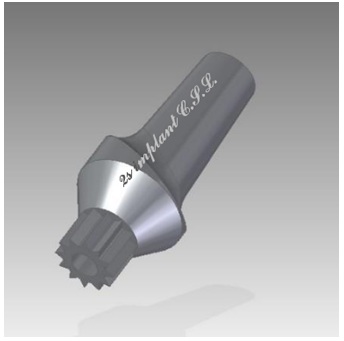 Figure 9: Abutment with star-attachment.
Protocol/metodologia
- • Opening of the gum either through an operculum or through detachment, at the surgeon’s discretion
- • Make an invitation in the bone, drilling holes with bone drills of different caliber with STOP, stopping at 1.5 mm from the floor of the maxillary sinus, avoiding breaking it because the membrane is adhered to it
- • Follows the screwing of the 2s Implant C.S.L., which, by its sharping apical part, will fracture the cortex of the maxillary sinus floor and will accommodate the residual bone in the 1,5mm recess in the part hollowed out like an osteotome (Figure 5)
The screwing will therefore produce a progressive fracture of the sinus floor by lifting the covering membrane avoiding the aforementioned rupture of the membrane.
Within six to eight months, we will achieve a reduction in the air volume of the maxillary sinus with the formation of new regenerated bone starting from the old border & / or floor of the maxillary sinus, with implants allocated and osseointegrated (Figures 10-12).
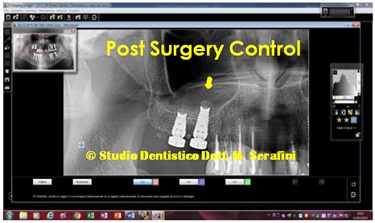 Figure 10: X-ray post Surgery control.
 Figure 11: X-ray Control at 8 Months later.
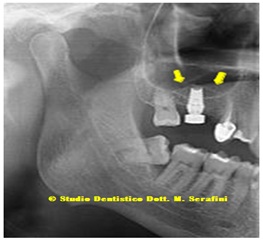 Figure 12: (Post Surgery control) in this Photo you can see the in detail, the raised membrane “tent”.
DISCUSSION
To date 40 2s Implant C.S.L. (Crestal Sinus Lift) have been inserted, in 40 Caucasian Patients, non-smokers, in a normal state of health, except for one Patient who has been recovering from chemo-therapy for one year. n ° 12 are male n ° 28 of female sex (Table 1 ).
|
Marca |
Diametro |
Lunghezze |
Quantità |
|
2s Implant |
4,2 |
13mm. |
1 |
|
2s Implant |
5 |
13mm. |
8 |
|
2s Implant |
6 |
13mm. |
8 |
|
2s Implant |
4,2 |
11,5mm |
0 |
|
2s Implant |
5 |
11,5mm |
6 |
|
2s Implant |
6 |
11,5mm |
6 |
|
2s Implant |
4,2 |
10mm. |
1 |
|
2s Implant |
5 |
10mm. |
4 |
|
2s Implant |
6 |
10mm. |
6 |
|
2s Implant |
4,2 |
8mm. |
0 |
|
2s Implant |
5 |
8mm. |
0 |
|
2s Implant |
6 |
8mm. |
0 |
|
Total |
|
|
40 |
Table 1: Summarizes the total numbers of implant inserted, divided by diameter and height.
Age range from 37 to 68 years, with bone conditions that range from severe osteopenia to normal bone conditions.
Bone heights between 4-5-6-7 mm. according to the classification of Mish to very few mm.1.5. Elevations: from single implant to large sinus lift with 2-3-4 implants.
No heterologous or autologous bone grafts were inserted inside the sinus, but "only the amount that the implant is able to displace inside", or P.R.P. or other blood derivatives for 39 patients.
Except for a patient who presented on the right side. 2.6. mm of bone in height, while on the left side. with 1,5mm post-extraction residual height of bone that was treated with grafting of fibrin sponges, P.R.P. and platelet gel.
All Patients have a personal medical record which reports the various phases from the beginning to the end of treatment with all the indexes and fiscal-code, all Patients have a detailed and timely iconographic kit. Rx and TC checks at six months, eight months (two months after loading) up to 18 months.
All patients underwent antibiotic therapy for a week starting from the day before the surgery consisting in clavulanic acid plus Amoxicillin one gram, every 12 hours and after the surgery they took enzymatic anti-inflammatories based on Seaprose S and mouthwash based on 2% chlorhexidine.
RESULTS
All patients treated to date have responded positively with excellent bone regrowth above and around the implants.
No implant failure.
Clinical cases of single and multiple implants for large sinus lift (come panels di figure)
1st Case
68-year-old male, one post-extraction implant and another not post extractive, with residual bone height of mm.
5 from the antral cavity, it is necessary to extract the 1.5 for coronal and radicular fracture (Figures 13,14).
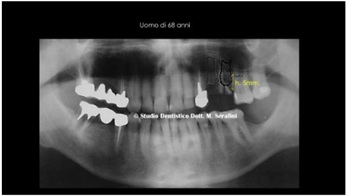 Figure13: Initial Orthopantomography.
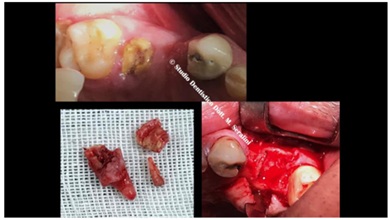 Figure 14: Clinical Case with extraction of the fractured root.
The planning fore was the insertion of two implants, 1.4 and 1.5 post-extraction with 2s Crestal Sinus Lift.
After the avulsion and careful dressing (toilette) of the surgical site, 2 implants were inserted, a standard 3.75 di 13mm and a 2s implant for the crestal Sinus Lift (Yellow arrow in figure 15).
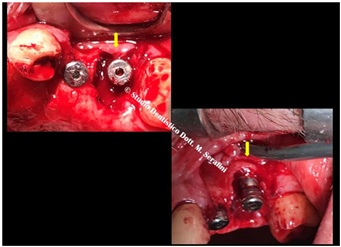 Figure 15: Implant allocated.
An animal bone graft is required together with growth factors shown in figure 16.
 Figure 16: Animal Bone graft mixed with P.R.P.
Post-surgical radiographic control, which shows that there is no graft inside the sinus and that the antrum retains the normal diaphanous (Figure 17). 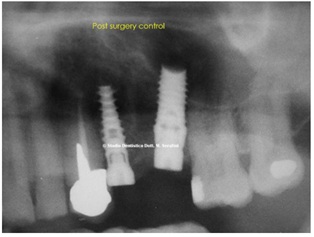
Figure 17: Post Surgery Control, normal diaphanous inside the sinus.
Radiographic and CT checkup 5 months after surgery and bone regrowth is noted above and around the implant (Figure 18).
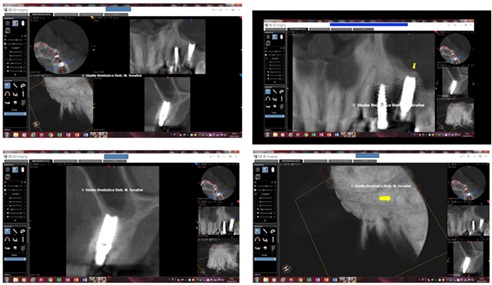 Figure 18: Checkup 5 months after surgery; note the yellow arrow in 3D reconstruction.
At this point the implants were loaded and finalized with a fixed prosthesis one-to-one and subsequent control at 14 months (Figure 19).
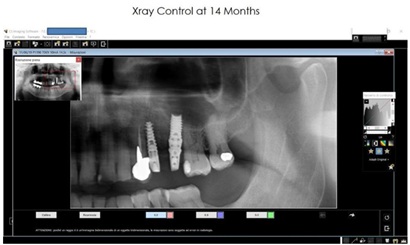 Figure 19: X-ray Control at 14 months.
Clinical Case of Great maxillary sinus lift for crestal view
65-year-old male with severe Osteopenia and severe periodontitis of: Stage 5 and Grade C (Figures 20-24).
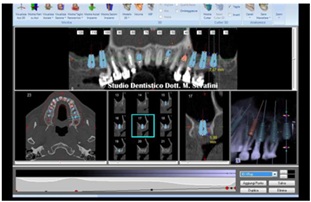 Figure 20: Planning.
 Figure 21: Right Side.
 Figure 22: Intra-sinus view.
 Figure 23: Left Side; note the severe periodontitis.
 Figure 24: Severe Osteopenia.
At this point it was decided to extract all the posteriors teeth and to perform two large lifts of the maxillary sinuses, 6 months apart from each other, because in the meantime we were interested in the lower arch, which is also strongly compromised by periodontopathy (Figures 25,26).
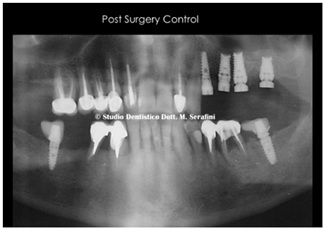 Figure 25: Post surgery Control Left Side.
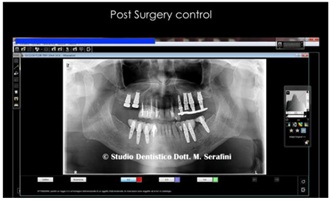 Figure 26: Post Surgery Control Right Side and Lower Implants.
Control at six months on the right side and at 14 months on the left side, after finalization (Figure 27).
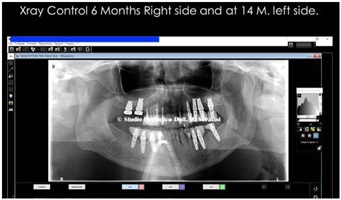 Figure 27: Control at six months on the right side and at 14 months on the left side.
Rx details in figure 28.
 Figure 28: Left Side and Right Side note: the red arrows were the old sinus pavment and the yellow arrows, the new sinus pavment.
Control two months after loading on the right side and sixteen months on the left side (Figure 29).
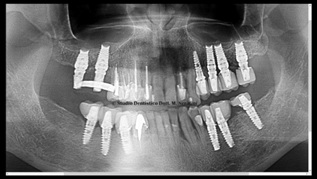 Figure 29: Control two months after loading on the right side and sixteen months on the left side.
TC left side shown in figure 30.
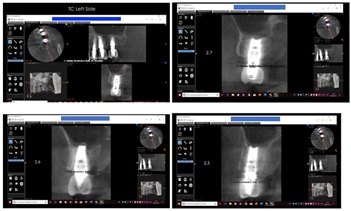 Figure 30: TC left Side.
TC right side shown in figure 31.
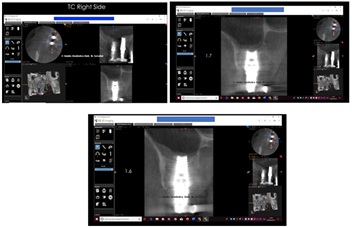 Figure 31: TC Right Side.
Final result with one-to-one fixed prosthesis in lithium disilicate with formation of papillae and orange peel mucosa (Figure 32).
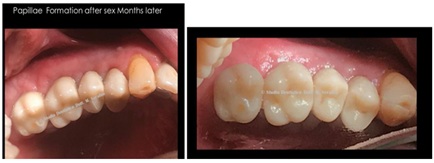 Figure 32: Formation of papillae and orange peel mucosa.
REFERENCES
- Ramanauskaite A, Ataman-Duruel ET, Duruel O, Tözüm MD, Yildirim TT, et al. (2019) Effects of clinical local factors on thickness and morphology of Schneiderian membrane: A retrospective clinical study. Clin Implant Dent Relat Res 21: 715-722.
- Ha J, Son JH, Sung IY, Cho YC, Choi JH (2020) Clinical outcome of implants placed in grafted maxillary sinus via lateral approach: A 10-year follow-up study. J Dent Sci 15: 270-277.
- Tatum Jr H (1986) Maxillary and sinus implant reconstructions. Dent Clin 30: 207-229.
- Boyne PJ, James RA (1980) Grafting of the maxillary sinus floor with autogenous marrow and bone. J Oral Surg 38: 613-616.
- Summers RB (1994) The osteotome technique: Part 3--Less invasive methods of elevating the sinus floor. Compendium 15: 698,700,702-704.
- Apparaju V, Vaddamanu SK, Vyas R, Vishwanath S, Gurumurthy V, et al. (2020) Is balloon-assisted maxillary sinus floor augmentation before dental implant safe and promising? A systematic review and meta-analysis. Niger J Clin Pract 23: 275-283.
Citation: Serafini M (2021) New Concept of Maxillary Sinus Lift through a New Implant Dedicated: “2s Implant”. J Stem Cell Res Dev Ther 7: 061.
Copyright: © 2021 Maurizio Serafini, et al. This is an open-access article distributed under the terms of the Creative Commons Attribution License, which permits unrestricted use, distribution, and reproduction in any medium, provided the original author and source are credited.